Pin This

Sunday, November 27, 2011

Turkey/Chicken Stuffing Casserole

I love Thanksgiving to be able to spend time with loved ones, give thanks for all our many blessings, and to cook. One of those things I am thankful for is "left overs". However, one can only eat Turkey sandwiches for so many days in a row..... Here is one way we like, to use up some of those Thanksgiving leftovers, I also like to use this same recipe with leftover chicken or rotisserie chicken from the grocery store.


Turkey Stuffing Casserole

1 box stove top stuffing (prepared as packaged)
2 C shredded Swiss cheese
1 8 oz pkg cream cheese
1 can evaporated milk
1 can cream of chicken soup
3-4 C chopped, cooked turkey/chicken


Place turkey/chicken in the bottom of a 3 quart casserole dish. 


Mix soup and milk together and pour over the turkey/chicken. 


Next layer the cubed the cream cheese and shredded Swiss cheese. Then top with the stuffing, and bake @ 350 degrees for 30-45 minutes until the cheese is bubbly. 

This is one of my family's favorites after Thanksgiving. Give it a try and let me know what you think. I am so thankful to have the ability to share with all of you some of my family's favorites. 

Have fun cookin'
Cyndi

Friday, November 25, 2011

Thanksgiving 2011 - Turkey Part II


So after removing the turkey from the brine, I rinsed it off, patted it dry, and pulled out the seasonings. My favorite is Mrs. Dash's Onion and Herb seasoning and poultry seasoning, I sprinkled it on top and rubbed a little under the skin. I also have been wanting to try injecting a turkey, just to see what flavors it gives a turkey. I wanted to play it safe, seeing that this was Thanksgiving and all, I melted some butter and at 1st I added some of the poultry seasoning to the butter - well it kinda clogged the needle , so I just brushed that over the top, and melted another batch of butter and just injected that into the turkey breasts.


We placed this years 24 lb Turkey on the grill about 9:00 AM with a 10 briquettes on each side along with a generous handful of apple wood. We continued adding about 10-11 briquettes as needed and handfuls of apple wood. (see 2010 post for how to directions) 


Dinner was supposed to be served @ 2:30, well the turkey decided dinner would be served on it's time, which was about 3:30 when it finally reached the temperature of 165°. As Rod carved into the turkey, juices just flowed , I just couldn't resist sampling, oh WOW!!! what an amazing flavor. Smoky, buttery, juicy. Beautiful pink smoke ring. Even better than last years. 


As with last years, I may have to cook another one on Saturday, just because this is gobbled up so quickly (pun intended).

This year I have included here some of my families favorite dishes, I have opted to leave out the mashed potatoes and gravy, the stuffing, and cranberry sauce as they are nothing too exciting ( regular potatoes, Stove top, and canned cranberries). Maybe in the next few years I may try some thing a little more exciting - but the family likes them why change them? We also had creamed cauliflower - My Mother in law brought that, some day I will get her recipe and share that one also. And of course we had Onion Bombs. (last years post) the best thing next to the turkey of course.  

 I will be sharing some of my families favorite "Leftover turkey" recipes later in the week.

Hope you all have/had a fabulous Thanksgiving.

Have fun cookin'
Cyndi

PS - if you enjoy my Blog - Please follow me - I would love to hear your comments - also if you have any questions or suggestions let me know. 
Cyndi


Thanksgiving 2011 - Yams

In my family candied yams have always been a part of Thanksgiving. My Mom liked to scoop out oranges , mix a little orange juice and brown sugar in with the yams, mash them up and put them in the oranges, top them with mini marshmallow and bake them until they were golden brown , she served them in the oranges. Well here is my version.


Candied Yams
3 Cans Yams
1 C Brown Sugar
1 C Mini Marshmallows
3 Tbs Butter

Melt butter in an electric skillet, drain all but 1 can of the yams, add the yams and cook till bubbling, add brown sugar, the let it cook till its nice and thick, start to mash up the yams and add the marshmallows and cool til melted. Serve. 

So good ya wanna go back for seconds....

Have fun cookin'
Cyndi

Thursday, November 24, 2011

Thanksgiving 2011 - Rolls

In years past I have pulled the lazy card and made Rhodes Rolls - Now to be honest I love Rhodes Rolls - But this year I thought why not make them from scratch. For years I have heard about these yummy rolls they make down in Salt Lake - I googled "Lion House Rolls" and this is one of what I found.  KSL / Lion House Rolls. I also you tubed Lion House Rolls this will show you how they roll them. 


Lion House Rolls 

2 cups warm water (110-115 degrees)
2/3 cup nonfat dry milk (instant)
2 Tb. dry yeast
1/4 cup sugar
2 tsp. salt
1/3 cup shortening (butter or margarine)
1 egg
5-5 1/2 cups flour, all purpose (bread flour can be used if you have it on hand)

In the large bowl of an electric mixer, combine the water and the milk powder and stir so the milk dissolves. Add the yeast to this mixture then the sugar, salt, shortening, egg and 2 cups of the flour. Mix on low speed of mixer until ingredients are wet, then turn to medium speed and mix for 2 minutes. Stop the mixer and add 2 more cups of flour then mix on low speed until the ingredients are wet, then turn mixer on medium speed and mix for 2 minutes. The dough will be getting stiff and you may need to remove the bowl from the mixer and mix in the remaining flour by hand. Add approximately 1/2 cup of flour and mix again. (This can be done by hand or mixer). The dough should be soft, not overly sticky, and not stiff. (It is not necessary to use the entire amount of flour). Scrape the dough off the sides of the bowl and pour approximately on tablespoon of vegetable oil all around the sides of the bowl. Turn the dough over in the bowl so it is covered with the oil. (This helps prevent the dough from drying out.) Cover with plastic and allow to rise in a warm place until double in size. Sprinkle a cutting board or counter with flour and put the dough on the flour. It is now ready to roll out and cut into desired shape and size of rolls. Place on greased (or parchment lined) baking pans. Let rise in a warm place until the rolls are double in size (approx. 1-1 1/2 hours). Bake in a 375-degree oven for 15-20 minutes or until they are browned to your satisfaction. Brush with melted butter while hot. Yields 2 to 2 1/2 dozen rolls. 

So after the 1st batch - I decided I probably ought to make another batch and after I tasted them - I doubled it. I hope there is enough....

Have fun cookin'
Cyndi

Wednesday, November 23, 2011

Thanksgiving 2011 - Turkey Part I

Last year I posted how we smoked our turkey for Thanksgiving. This year is round II.  I soaked the turkey last year in a brine this year I took it up a notch and changed up the brine.

I started with
1 C Cider vinegar
1 Medium Onion, peeled and quartered
8 Small Cloves Garlic, no need to peel I just cut them in half
3 Granny Smith Apples - peeled, cored, and quartered
1 C Salt
1 1/2 Tbsp Peppercorns
1 1/2 tsp Thyme leaves
2 Tbsp Rosemary
1 Tbsp Orange peel
I placed all of these in a pot and brought them to a boil, poured it into the cooler with 2 quarts of water. I then prepared the turkey (removed the neck, gizzard package as well as the gravy pouch), rinsed and patted dry my turkey (24 Lbs). I placed then placed the turkey into the cooler and added 2 quarts of ice and enough water to cover the turkey. Through out the day as anyone was walking past the cooler I had then give it a jiggle just to circulate the flavors.

Note on some of these I did not peel them  - they will not be cooked into the turkey - and will be rinsed off.

Let the Turkey sit in the brine for 24 hours. Rinse and pat dry.

That's all for now - Part II to come tomorrow...
Have fun Cookin'

Thanksgiving 2011 - Pies

A Boyer Thanksgiving, it is a must to include a Butter Crunch Pie. This is due to the fact that Rod will not eat Pumpkin, granted there are other pies but by far this one is our favorite.


Before Meringue

Butter Crunch Pie 
Crust
1 C Flour
½ C Brown Sugar
½ C Butter
1 C Finely Chopped Pecans or Walnuts
Filling
Chocolate Pudding (cook & serve)(small box) topped with meringue.
Melt butter in a glass dish in the microwave. Add flour and brown sugar, mix well. Add nuts. Push into a pie pan 9 or10 inches. Bake at 350 Degrees for 8-10 minutes until golden brown.
Cook pudding (pie filling directions) according to the package.
Fill hot crust with filling (pudding). Top with Meringue. Bake with Meringue till peaks are golden brown 350°. Chill before serving.
Meringue
4 egg whites,
½ tsp Cream of Tartar,
½ tsp Vanilla,
½ C Sugar

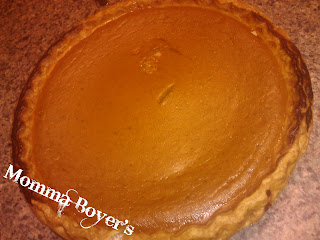
Now just because Rod won’t eat Pumpkin pie doesn’t mean I don’t make them – I love them and to me it’s just not Thanksgiving without them. A few years back My MIL was diagnosed with Celiac Disease. I felt like she was getting left out when it came to desserts. Up on making my pies that year I was faced with more filling that crust – I found a small glass bowl in my cupboard and filled it with the rest of the filling and baked it right along with my pies. She was so delighted to be able to have dessert with the rest of the family.

Pumpkin Pie

Crust
I've never been very good at making crusts, so my favorite crusts are the Deep Dish ones from Marie Calendars found in the freezer section at your local groceries.

2 Deep Dish Pie Crusts

Filling
1 ½ C sugar
1 tsp Salt
3 ½ tsp Pumpkin pie spice
4 Lg Eggs
4 C Pumpkin puree (or 1 (29 oz) can of Pumpkin
2 Cans Evaporated Milk

Mix sugar, salt, and pumpkin pie spice in a small bowl. In a large bowl, beat the eggs, Stir in the pumpkin and sugar mixture. Gradually add the evaporated milk. Pour into the pie shells. (I like to put my pie shells on a cookie sheet before I add the filling.)

Bake in a pre-heated 425° oven for 15 minutes, then lower the temperature to 350° and bake for 40-50 minutes or until a knife inserted in the center comes out clean. Cool or serve warm. (Refrigerate leftovers (if there are any)) With whipped cream or Cool Whip ®
This is the one I made for My Mother-in-Law


Have fun cookin’

Cyndi

Pre Thanksgiving.

Ok - this is just a heads up, This year I am going to blog the whole Thanksgiving Dinner  - from smokin' the turkey to our unique pies.... stay tuned.

Monday, November 14, 2011

Carnita's


The other day, we had an unusually slow day at work, as I was checking my e-mail there was a ticker that ran across the top that said Carnita’s from the “Homesick Texan”. I was intrigued. I clicked on the link Blogferry.com and thought I give this a try. So here is my adaptation  


Homesick Texan Carnitas


2.5-3 pounds boneless pork shoulder or pork butt, cut into 2-inch cubes
1/2 cup orange juice
1/4 cup lime juice (I had Key Lime Juice- worked wonderfully)
4 cloves garlic, (I used the already chopped and bottled – to save time)
1 teaspoon ground cumin
1 teaspoon salt, plus more to taste
Corn tortillas, for serving.

Place the pork in a large Dutch Oven.  Add the orange juice, lime juice, garlic, cumin, salt and enough water to just barely cover the meat. Bring the pot to a boil and then reduce the heat to a simmer. Simmer uncovered for two hours. Don’t touch the meat. (You could put all this in a Crock pot and let simmer for 4 hours on high. Then transfer to the Dutch Oven to for the last step.)
After two hours, increase the heat to medium-high and while occasionally stirring and turning the pieces, continue to cook for about 45 minutes, or until all of the liquid has evaporated, leaving only the rendered pork fat. Let it sizzle in this fat long enough to brown at the edges, turning pieces gently (they’ll be eager to fall apart), only as needed.
When pork has browned on both sides, it’s ready. Adjust seasonings to taste and serve on warmed tortillas with fixings. (see below)


Homemade Tortillas

2 C Masa Harina
1/4 teaspoon salt
1 C Water + a little

Mix all ingredients to make a stiff dough.  Roll the dough into a 1 ¾” ball, flatten it slightly, place in between 2 pieces of plastic, (I cut apart a gallon Ziploc bag and trimmed to fit the tortilla press- Note if you do not have a press you can use the bottom of a pie plate or heavy skillet)
Press the dough ball out to a small disc, pressing firmly on the press. Cook the tortilla on a flat griddle with a little oil, until the edges dry up and there are brown spots on both sides. Tortillas will be stiff but will soften as they stand.

Serve with shredded lettuce, cheese, avocado, sautéed onion, and/or salsa. Personally I like the avocado with a little lime juice.

Made these for my family Sunday Night – I wanted to sit and eat the meat alone all night. I am grateful for that little ticker that came across my screen the other morning and to the Homesick Texan who share the recipe. I am addicted.

Hope you will all give this recipe a try and maybe you will be addicted too.

Have fun Cookin’
Cyndi

Sunday, November 13, 2011

Pumpkin Muffins


The other day I was craving Pumpkin bread , I searched the web and came up with this recipe Cream Cheese Pumpkin Bread which turned out fabulous, being one of the few in my house that will eat Pumpkin bread, I took some to work with me and shared with my Co-workers. One of them mentioned they still had 2 pumpkins from Halloween that they had not carved and asked me if I wanted them. Of course I couldn't turn them down. 

Saturday I cut them up and baked them (350°) with some water in the bottom of a pan and covered them with foil til they were fork tender (like a potato)(about 30-45 minutes), let them cool. I then scooped the meat out and pureed it in my blender by the time I was done with both pumpkins I had 8 bags with 2 cups each (pretty standard for pumpkin recipes). I also saved the pumpkin seeds from both pumpkins, Another one of my favorites is Roasted Pumpkin Seeds. wash the seeds and put them in a pan with some salted water and let boil for 5 minutes drain and place on a baking sheet and bake @ 350° for 2-3 hours til golden brown (roasted in color). As I finished up with the pumpkin, I saved the last bit and made these little bites of yumminess. 


Pumpkin Muffins

1 cup pumpkin
1/2  cup granulated sugar
1/2  cup brown sugar
1/3 cup vegetable oil 
2 large eggs
1 tsp pumpkin pie spice
½ tsp baking powder
1/4 tsp cinnamon
1/2 tsp baking soda
1/2 tsp salt
1 1/2 cups all-purpose flour
About 1 tbsp raw sugar for sprinkling on top

Preheat oven to 350° and grease the cups of a mini muffin tin very well.  

In a large bowl, whisk together the pumpkin, sugar, vegetable oil, eggs, all spices, baking soda and salt.  Then whisk in the flour until the batter is just smooth.  


Divide the batter among the greased muffin cups, filling each one just a bit more than 3/4 full. (I put mine in a gallon Ziploc bag and snip a corner off and pipe the batter into the cups.)  Sprinkle the top of each mini muffin with a bit of Raw sugar and bake in a preheated oven for about 10-14 minutes, or until they are golden brown, and a toothpick inserted into the middle comes out clean.


If you want you could add mini chocolate chips to this.  

Cool the on a rack until cool enough to handle, remove them to cool fully.

Yes you can use "real" pumpkin to make the same recipes you can with a "can" of pumpkin. This time of the year pumpkin recipes are my favorite. As I stated earlier I am in the minority in my home when I make them, so my neighbors and co-workers benefit when I bake. I hope that you will give these a try and will enjoy them as much as I do. 

Have fun Cookin'
Cyndi

Monday, November 7, 2011

Beef Stroganoff on a Budget

Beef Stroganoff on a Budget


 I have a large family that has quite the appetite, this recipe makes quite a bit but it's great the next day served over baked potatoes. Here is what I started with...
2 -2 1/2 lbs of Hamburger
1 C chopped onion
1 clove chopped garlic
1 6.5 oz can mushrooms (you can use fresh if you have them)
1 envelope Au Jus mix
1 C Beef or chicken stock
8 oz Sour Cream
1 Can Cream of mushroom soup (I used 2 to stretch this a little further)
1 package of Noodles ( My personal favorite is the No Yolk Brand)


1st saute the chopped onion and the garlic in 1 tablespoon olive oil (Note: I cheated, I buy already chopped / minced garlic in the bottles - it saves oodles of time and messes) If you would like to use *fresh Mushrooms add them in with the onions and garlic and saute them till the are tender.

  Brown the burger.
 I want to point out the nifty tool I use to brown my burger - this is made from  hard silicone (from Pampered Chef) - it makes browning an easy task and nice even pieces.  The reason for separating the previous steps is because I like to rinse my burger to get rid of any excess grease. (picture on the right)


 Combine the onions, garlic, and burger.


Add Au Jus mix


1 C Broth ( I would normally use Beef Broth but I didn't have any and Chicken tastes just fine)


Add can of mushrooms (omit this if you use fresh Mushrooms (*see note above), Cream of Mushroom Soup


Add Sour Cream and heat on med-low for about 15 minute or until bubbly- After all the ingredients are added, you could put this in a Crock Pot and let simmer all afternoon - Just cook the noodles (or baked potatoes) and serve. 


Fill pot with water and put on to boil - I usually add salt to the water to add a little flavor to the noodles


Add Salt and Pepper to taste


Add noodles to the boiling water. Cook according to directions on package.


The finished product - My family likes to top this with a little Parmesan cheese.

A variation of this would be to use beef tips or stew meat, brown the meat, add to a crock pot, add the rest of the ingredients and let simmer all day on low till the beef is tender, serve over noodles or potatoes. 

This is one of my family's favorite meals - I hope you will enjoy it as much as we do. 

Have fun Cookin'
Cyndi

Related Posts Plugin for WordPress, Blogger...